Showing posts with label alipyper likes to bake. Show all posts

Tuesday, October 23, 2012

Learning to Smock, a Bake Sale, and Granny Squares


I signed up for the Smocking Class at Harmony and I'm over the moon to finally learn how to embroider smocking!! I've wanted to learn since {G} was a baby and for one reason or another I never have. Thank you Harmony!! And I also learned how to embroider bullion roses. Bonus. My lines are a little wonky, but I'm thrilled with how it's turning out. Just need to sew the smocked panel into a skirt and I'll be done!


I promptly put Sabrina's cute new logo that she painted for me to good use! {K}'s soccer team was having a fundraiser so I made a little tag and put them on my famous Peanut Butter Cookies with Reese's Peanut Butter Cups, Double Chocolate Peanut Butter Oatmeal Cookies, and my mom's Gingersnaps to help raise a little bit of money. Super happy with the logo!!


I'm teaching another class at Harmony on Saturday November 3rd from noon to 2 pm. Do you want to learn how to crochet Granny Squares?? I'll discuss how to quickly change colors, weaving in ends as you crochet, different methods of circular crochet and joining the blocks together as you go! The 2 hour class will be jam packed with tips and tricks that you can apply to all your crochet projects. Come join us for a great class to elevate your basic crochet skills to the next level. Only $20!

Thursday, October 18, 2012

alipyper likes to bake


My sweet friend Sabrina designed and painted a new logo for me!! I'm super duper thrilled about it! Like turn cartwheels over it. I think it's darling and I'm going to plaster it all over everything I bake from now on :)

Friday, September 28, 2012

Benefit Bake/Yard Sale

New York Style Cheesecake, Double Chocolate Peanut Butter Oatmeal Cookies, Gingersnaps, Coconut Cake, & Peanut Butter Cookies with Reese's Peanut Butter Cups
Our friends, the Truax Family, are having a huge benefit bake and yard sale tomorrow, Saturday September 29th starting at 8:00 am at 11742 Current Creek Drive, South Jordan, UT 84095 with all proceeds going toward their adoption of three sibling orphans from the Ukraine.


Come Support Our
Benefit Yard/Bake Sale!
We’re raising money to help three
orphans from Ukraine leave their
life in an orphanage behind and
experience life with a family in the US.
They need your help!
All proceeds from the yard/bake sale
go toward adoption funds.
Join us Saturday morning 
(September 29, 2012)
beginning at 8:00 am.
11742 Current Creek Drive,
South Jordan, UT 84095
 
I will be bringing a yummy 10" New York Style Cheesecake, a 9" double layer Coconut Cake, Gingersnaps, Double Chocolate Peanut Butter Oatmeal Cookies, and Peanut Butter Cookies with Reese's Peanut Butter Cups. 
 *PLUS* 
A dear friend gave me a large bag of gorgeous apples and said, "Use these for the fundraiser!" So, I'm also bringing a Mile High Apple Pie! 
 
I've been making this yummy, yummy pie for 20 years! Picture circa 1995 - excuse the burnt edges :(


If you can't make it to the Bake/Yard Sale tomorrow, I will take orders for a short period of time and deliver in Northern Utah! With all proceeds going towards the Truax Adoption Adventure.

Wednesday, August 15, 2012

Lemon Icebox Cake


 This is my new favorite dessert. Seriously.

Ridiculously easy? Check.
Deliciously yummy? Check.
Satisfies all sorts of cravings? Check.
Tastes like a lemon ice cream sandwich? Check.

Layer graham crackers with Light Lemon Curd and freeze 12 hours. Yeah. It's that simple. 

Tuesday, August 14, 2012

Hiking with Birthday Cake

Park City, UT overlook from Millcreek Canyon, Salt Lake City, UT
Turning 40 has been somewhat of a traumatic transition, so I made myself TWO birthday cakes. On the morning of my birthday I ate a piece of Martha Stewart's One Bowl Chocolate Cake for breakfast, packed a piece of chocolate cake to eat for lunch on my hike, and ate another piece before the Mr. and I went out for Indian food for a dinner celebration. 

Did you know that Martha and I share the same birthday? Well. We do.

Eating chocolate cake on your birthday, on a hike, doesn't count for calories. Right?

Mountain meadow - Millcreek Canyon
The boys and I met my sister and her kids in Salt Lake City and we hiked up Millcreek Canyon to the Park City Overlook - which was so gorgeous! Being in the upper mountain meadow, breathing fresh mountain air, was tremendously cathartic and with every gentle breeze I felt the anxiety and fears of getting older and entering a new chapter in my life float away. It was a very clearing and calming experience. I LOVED being in the mountains on my birthday.

My sister Sarah and I on the hike.
A few days later for our monthly Sunday family dinner, I made a super yummy lemony lemon cake. I was so pleased with how it tasted and I'm now obsessing over lemony desserts! I adjusted this lemon buttermilk cupcake recipe and baked it into two 9" cake rounds. I then filled the inside layer with fresh lemon curd mixed with sweetened whipped cream and covered the cake with a yummy cream cheese lemon frosting. OH MY GOODNESS! It was yummy. Like super yummy. Like, wake up and eat lemon cake for breakfast, lunch and dinner when it's not your birthday anymore, yummy.

Please proceed with caution because you might end up eating this whole cake by yourself.


Lemony Lemon Cake Recipe
Preheat oven to 350°F. Makes approximately 7 cups of batter

3 cups all purpose flour
1 tsp baking powder
1/2 tsp baking soda
1/2 tsp salt
1 cup butter, room temperature
2 cups sugar
4 large eggs
1 cup buttermilk
1/3 cup fresh lemon juice
2 Tbsp lemon zest
1 tsp lemon extract
1 tsp pure vanilla extract

Butter two 9”x2” round cake pans. Put parchment circles in pans, butter parchment, then flour pans, tapping out excess flour. Set aside.

Sift flour, baking powder, baking soda and salt in a medium bowl. Set aside.

Combine buttermilk, vanilla, lemon juice, zest, and lemon extract. Set aside.

In a medium bowl, cream butter. Slowly add sugar 1/4 cup at a time and beat until the butter/sugar mixture is light and fluffy. Add eggs one at a time, beating each egg until incorporated before adding the next. Alternately add the dry ingredients and the wet ingredients, mixing on low and frequently scraping down the sides of the bowl to make sure the batter is nice and smooth with no lumps, without over mixing. Pour batter into prepared pans.

Bake 40 to 50 minutes, or until a cake tester comes out clean. Cool cakes in pans 10 minutes before removing cakes to cool completely on wire racks. Double wrap the cake layers in plastic wrap and freeze for at least 4 hours, or up to one week.

When you’re ready to frost the cake, remove layers from freezer. Place bottom layer on cake plate. Pipe a thick bead of Lemon Cream Cheese Frosting around edge. Fill the inside with Light Lemon Curd Filling. Carefully place second cake layer on top and cool 1/2 hour in refrigerator.

Remove cake from fridge. Crumb coat the two cake layers with Lemon Cream Cheese Frosting. Return cake to refrigerator for 15 minutes. 

Finish frosting the cake with Lemon Cream Cheese Frosting. Serve completely chilled.


Lemon Cream Cheese Frosting
Makes about 4 cups

8 oz. cream cheese, room temperature
1/2 cup unsalted butter, room temperature
1 Tbsp fresh lemon juice
1 tsp finely shredded lemon zest
5 1/2 to 6 1/4 cups powdered sugar

Beat cream cheese and butter in medium bowl until smooth. Add lemon juice and zest and two cups of powdered sugar. Continue adding powdered sugar until you reach a spreading consistency.  Frost tops and sides of two 8-inch or 9-inch cake layers.


Light Lemon Curd Filling
Makes about 2 cups

1 cup lemon curd (good quality store brand or home made)
1 cup prepared sweetened whipped cream

Carefully fold lemon curd into whipped cream. Use immediately.

Here's a link to an easy to print recipe:
Lemony Lemon Cake Recipe

Want to know what to do with the left over Light Lemon Curd Filling? Go here for the easiest and best dessert EVER!

Monday, March 12, 2012

Chocolate Peanut Butter Oatmeal Cookies


Combining all my favorite flavors, these dense, rich cookies pack a chocolatey peanut butter punch!


Chocolate Peanut Butter Oatmeal Cookies

1 cup unsalted butter, room temperature
1 1/2 cup brown sugar
1 cup sugar
1 cup natural peanut butter
2 eggs
1 Tbsp vanilla
1 1/2 cups all purpose flour
1/2 cup cocoa powder
1 tsp baking soda
1 tsp salt
3 cups instant rolled oats
2 cups semi-sweet chocolate chips

Preheat oven to 350ยบ F.

Cream butter, sugars and peanut butter in large bowl until light and fluffy. Blend in eggs and vanilla. In a separate bowl, combine flour, cocoa powder, baking soda and salt. Slowly add flour mixture to butter mixture, mixing in well. Stir in oats and chocolate chips. Dough will be quite stiff.

Using a medium large scoop, drop cookie dough onto parchment lined baking sheet. With the bottom of a glass, press down each cookie. Bake 14 to 16 minutes, or until set. Cookies will be slightly moist in the center. Do not overbake! Cool for a minute, then transfer to wire rack to cool completely.

Enjoy with a tall glass of milk!

Chocolate Peanut Butter Oatmeal Cookies

Monday, March 5, 2012

New York Style Cheesecake


{G} requested a New York style cheesecake for her birthday cake at the end of December and so did the Mr. for his birthday last week. It's definitely a favorite at our house!

Over the years I've adapted the recipe a little here and a little there. I've lowered the cooking temperature and increased the cooking time, added more cream cheese, and discovered a little trick that has helped prevent cracks in the top of my cake while it cools down.


New York Cheesecake
adapted from the Ultimate Philly Cheesecake recipe book

*important*
You want to bake your cheesecake in a "moist" oven. I've never had a steam setting for my oven, so I always place a 13x9 inch casserole baking pan half filled with hot water on the bottom rack of the oven as soon as I turn it on to preheat. Leave the pan of water in the oven until the cheesecake is cooked.
 
Allow your cream cheese and eggs to come to room temperature before mixing. And don't over beat your batter!


Preheat oven to 325ยบ F. Place pan of water on the bottom rack of the oven.

CRUST
1 cup graham cracker crumbs
3 Tbsp sugar
3 Tbsp melted butter

FILLING
5 (8 oz) pkgs Philidelphia Cream Cheese, room temperature
1 cup sugar
3 Tbsp flour
1 Tbsp vanilla
4 eggs
1 cup sour cream

For the crust: Empty one package of graham crackers in a food processor and process until you have fine crumbs. Mix the 1 cup of graham cracker crumbs, sugar and melted butter and press into the bottom and up the sides of a 9" springform pan lined with a parchment paper circle. Bake for 10 minutes. Remove from the oven and set aside.

Reduce oven temperature to 300ยบ F.

Beat cream cheese, sugar, flour, and vanilla at medium speed with an electric mixer until well blended. Add eggs, 1 at a time, mixing at low speed after each addition, just until blended. Fold in sour cream and pour over baked crust.

Set timer and bake cheesecake for 1 hour 30 minutes. Don't open the oven door while your cheesecake is baking! Keep checking the cake every 5 to 10 minutes for the next 30 minutes. 

As soon as the center dot of your cheesecake is about the size of a silver dollar and almost set (the edges will be puffy and might be slightly brown at this point), turn off the oven and immediately invert a metal bowl over your cheesecake IN THE OVEN.


Then shut the door of the oven and allow the cheesecake to fully cool down and come to room temperature covered by the inverted bowl while remaining in the oven. When the cheesecake is cool, remove from oven  and refrigerate 4 hours or overnight, keeping the cake in the springform pan.

When you're ready to eat the cake, carefully run a knife or metal spatula around the rim of the pan to loosen cake and remove the springform sides and serve the cheesecake topped with pie filling or fresh fruit and fruit glaze.


This recipe also works well in a 10" springform pan. Your cheesecake will be shorter and will need less time in the oven to bake. Enjoy!

New York Cheesecake Recipe

Friday, March 2, 2012

Dutch Oven Peasant Bread


For {I}'s Medieval Feast I made 8 loaves of the amazingly simple New York Times No Knead Dutch Oven Bread. I scoured the house for pots with form fitting lids and used both ovens to crank out four loaves at a time between two ovens. It worked like a charm! {I} loves this bread and had been talking it up to his classmates, so the slices of bread went pretty quickly. Crusty exterior with a chewy center, it's just like European peasant bread. So yummy and unbelievably easy to make!


Friday, February 24, 2012

Free Gingerbread Castle Template


{I} is in the midst of a Medieval section at school and all the kids had to make a 3-D castle, with 10 labeled parts, and bring it in to school.


{I} convinced me to help him make his out of gingerbread. He did twist my arm...but only a little bit. We worked on a design, I baked the pieces and we constructed it together with tinted meringue powder royal icing.


It was surprisingly easy to construct! I forgot to get the exact outer measurements before I took it into the school, but the gingerbread is about a 1/4" thick, so the basic measurements are 12 1/2" x 12 1/2", with the drawbridge sticking out a little bit more.


We couldn't resist adding some knights and a dragon.


We labeled these 10 parts of a castle:
1. Moat: A ditch around the castle, usually filled with water.
2. Drawbridge: A bridge that could be raised or lowered. It was usually located over a moat.
3. Wall: Strongly built and usually not less than 10 feet thick, the wall surrounded the courtyard of the castle.
4. Portcullis: Main gate of the castle. It was made of heavy wood, reinforced with iron grating and could be raised and lowered.
5. Murder Holes: Holes in the ceiling just after the front gate. The holes were used for dropping large stones on attackers who got through the front gate.
6. Parapets: Low walls around the top edge of a tower or castle wall.
7. Machicolations: The reason why parapets were built. They were holes in the parapets used for dropping all kinds of things, such as boiling oil, hot water, stones, etc.
8. Arrow-loops: Narrow openings in the castle towers through which archers fired their arrows on the enemy below.
9. Outer Bailey: The first courtyard inside the outer walls of the castle.
10. Keep: The strongest and most heavily fortified part of the castle, as it was designed as the last line of defense. The Keep usually housed the owner of the castle, his family, and the Great Hall. The Great Hall was a room at the heart of the castle used for family dinners, banquets, games, dancing, entertainment, and sometimes also contained a courtroom.  


If you want to make your own gingerbread castle use 4x the recipe used for my Gingerbread Houses and this Gingerbread Castle Template.


When {I}'s Medieval section is done at school, he is planning on devouring the castle with his friends! Yummy!

Gingerbread House Recipe

Saturday, December 10, 2011

Hot Chocolate and Cookies


Invite your friends over for a hot drink and a treat and spend some lovely time together!

Thursday, December 1, 2011

Gingerbread Houses


Making gingerbread houses at Christmas time has been a family tradition since I was very small.


Most were given away to friends and neighbors, but we always kept at least one. Mom made us wait until after Christmas to eat it, although there were always candy pieces that mysteriously disappeared from seemingly discreet places.


The recipe below is my mother's recipe and it is AMAZING. I use this same recipe for cut-out gingerbread cookies. If you know the gingerbread houses won't get eaten, you can substitute vegetable shortening for the butter to cut costs.


One recipe will fill a 18" x 13" x 1" cookie sheet and is enough to make 1 large gingerbread house. Double the recipe and you can make 5 mini houses in two cookie sheets. Score the cookie dough with the pattern pieces before you bake the cookie sheet and then score the pattern again IMMEDIATELY after you take them out of the oven.

Gingerbread House Recipe
Makes one large gingerbread house
Preheat oven to 350ยบ F

3/4 cup unsalted butter, room temperature
1 cup sugar
1 egg, slightly beaten
1/4 cup dark molasses
2 cups flour
1/2 tsp salt
1 Tbsp ground ginger
1 tsp ground cinnamon

Cream butter and sugar. Add slightly beaten egg and dark molasses. Mix well. Add dry ingredients and mix well. Cookie dough should pull away from the edges of the bowl, but should not be too dry (If you are rolling out the dough for cut out gingerbread cookies, add a bit more flour so that the dough is stiffer). Turn out dough onto an ungreased 18" x 13" x 1" cookie sheet and flatten dough, completely covering the bottom of the pan. Smooth, lay out gingerbread house pieces and score the pattern with a sharp paring knife.

Bake for 12 - 14 minutes, rotating pan halfway through baking. Gingerbread is done when the top is golden brown. As soon as you remove the cookie sheet from the oven score the pattern pieces again. Allow cookie sheet to cool 15 minutes. Carefully remove the excess gingerbread pieces, then using a metal spatula carefully remove the gingerbread house pieces to a cooling rack and cool completely.

Use a meringue powder royal icing as "glue" to construct the house and attach the candies. If you aren't able to find meringue powder at your local grocery, craft, or baking store, use an egg white royal icing recipe. Please note that your eggs must be very fresh if the icing will be eaten by young children or anyone whose health could be compromised. You can be as simple or fancy as you want. When the kids are decorating, I just fill disposable plastic pastry bags with meringue powder royal icing and cut the tip of the bag off so that they can pipe the icing themselves. Use plastic bread bag closures or twist ties to secure the top of the pastry bag. Don't overfill bags! Little hands forget to squeeze from the top down.

Gingerbread houses don't last long at our house any more!

Gingerbread House Recipe
Gingerbread House Template


Thursday, November 24, 2011

Pumpkin Pie Recipe

{G} and her first pie!

I learned the secret for this amazing pumpkin pie while I was working as a pastry chef during college at a local restaurant. Instead of using sweetened condensed or evaporated milk, this recipe calls for heavy whipping cream. It produces a light and creamy pie with a firm texture, without being cloyingly sweet. It is definitely a family favorite!

Happy Thanksgiving to you all!

Pumpkin Pie Recipe
Makes two pies.

First, make the pie crusts from the following recipe, making sure all your ingredients are very cold. I use a food processor, but you can use a pastry cutter or two knives to cut the butter into the dry ingredients. Cover the pie crusts with plastic wrap once they are rolled out and in the pie plates and store them in the refrigerator until you're ready to fill them with the pumpkin filling.

Pate Brisee Pie Crust Recipe
adapted from Martha Stewart
Makes two pie shells.

2 1/2 cups cold all purpose flour
1 Tbsp. sugar
1 tsp. salt
1 cup cold unsalted butter, cut into small pieces
4 to 6 Tbsp. ice cold water

Put flour, sugar and salt in a food processor fitted with a cutting blade. Pulse to mix. Add the cold butter to the dry ingredients and pulse a few times until the butter is cut into pea sized chunks. Slowly add the cold water through the feed tube one tablespoon at a time while the processor is running. Be careful not to add too much water, or process for more than about 30 seconds. When the dough starts to come together and isn't wet or sticky, stop and check the dough by squeezing the dough between your fingers.If the dough is still crumbly, add a bit more water.

Divide dough in half and turn out on to a large piece of plastic wrap. Grasping the ends of the plastic wrap with your hands, press the dough into a flat circle with your fists. Wrap completely in plastic and chill 30 minutes.

When you're ready to roll out the dough. unwrap the dough disk, but leave it on the plastic wrap. Place a second piece of plastic wrap on top, and slowly roll out the dough to the desired shape between the two pieces of plastic. Take the top piece of plastic off and carefully flip the crust over into the pie dish. Remove the second piece of plastic and trim and crimp the edges of the pie crust. Repeat for the second pie crust.

Pumpkin Pie Filling
Makes 2 pie fillings
Preheat oven to 425°F

1 1/2 cups sugar
1 tsp. salt
2 tsp. ground cinnamon
1 tsp. ground ginger
1/2 tsp. ground cloves
4 large eggs
1 large can (29 oz.) 100% pure pumpkin puree
2 cups heavy whipping cream

Mix sugar, salt, cinnamon, ginger and cloves in a small bowl. Set aside.

In a large bowl, mix eggs until frothy. Stir in pumpkin puree and the sugar-spice mixture. Gradually stir in heavy whipping cream. You should have about 8 cups of filling for the two pies.

Divide filling in half and pour into two unbaked pie shells. Place pies in 425°F oven for 15 minutes. Reduce temperature to 350°F and bake pies for 40-50 minutes, or until knife inserted near center comes out clean. Cool on wire rack for 2 hours. Refrigerate overnight (very, very important!!).

Serve with sweetened whipped cream.

Pumpkin Pie Recipe

Wednesday, November 9, 2011

Lemon Curd Recipe


What do you do with 24 egg yolks left over from a gigantic wedding cake?

Make yummy, tangy, sweet, yellow lemon curd.

Lemon Curd
makes about 2 cups

1 cup sugar
2 Tbsp. cornstarch
2/3 cups water
1 Tbsp. finely shredded lemon zest
6 Tbsp. fresh lemon juice
6 beaten egg yolks
1/2 cup unsalted butter, cut into small pieces

Mix sugar and cornstarch together in a medium saucepan. Add water, lemon zest, and lemon juice. Cook and stir over medium heat until slightly thickened and bubbly.

Slowly stir half of the lemon mixture into the egg yolks. Then return all the egg mixture back into the saucepan. Cook, stirring constantly, until mixture comes to a gentle boil. Cook and stir for 2 minutes more. Remove from heat and stir in butter pieces, completely incorporating melted butter.

Cover curd with plastic wrap and chill for at least 1 hour, or up to 48 hours.

Recipe adapted from Better Homes and Garden Cookbook.

Here are some ideas of what to do with it once you're done...besides just spooning it into your mouth.

Lemon Tassies
Lemon Meringue Cupcakes
1-2-3-4 Lemon Cake


Sunday, November 6, 2011

Wedding Carrot Cake Recipe


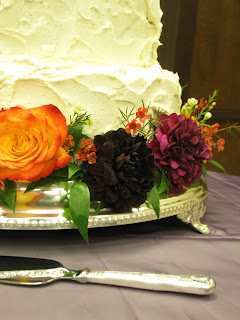
Phew! The wedding cake was made, transported, and assembled without too much drama. Luckily the wedding dinner was practically right across the street from the house. I was so pleased with how it turned out!


The dramatic fall colors against the simple, bright white frosting were so vivid, so gorgeous!


The top layer of the cake was vanilla cake with blackberry filling. The second layer was vanilla cake with vanilla buttercream filling. The third layer was chocolate cake with chocolate fudge filling. And the bottom layer was carrot cake with cream cheese filling. All the cakes were moist and yummy but my favorite flavor by far was the carrot cake.


The recipe below makes about 4 2/3 cups of carrot cake batter, without any nuts. I tripled the recipe for each 14" layer and filled each layer with 12 cups of batter. The 2 cups of batter left over from each cake layer was made into carrot cupcakes. This cake was moist, but the texture was very firm, so it held up really well on the bottom of the cake. LOVE this wedding cake recipe!!

Carrot Cake

2 1/3 cups all-purpose flour
1 1/2 tsp. ground cinnamon
1 1/2 tsp. baking soda
1/2 tsp. salt
1/2 cup canola oil
1/2 cup buttermilk
1 cup sugar
3 large eggs
1 tsp. pure vanilla
2 1/3 cups shredded/grated carrot
1 cup walnuts or toasted pecans, chopped fine, optional

Preheat oven to 325°F. 


Butter two 8" x 2" round cake pans. Put parchment circles in pans, butter parchment, then flour pans, tapping out excess flour. Set aside.


Sift flour, cinnamon, baking soda, and salt. Set aside.


In a medium bowl, mix canola oil, buttermilk, sugar, eggs, and vanilla. Add shredded carrot and mix until well blended. Add the dry ingredients, mixing on low and frequently scraping the bowl to make sure the batter is nice and smooth with no lumps, without over mixing. Pour batter into prepared pans.


Bake for 35-45 minutes, or until a cake tester comes out clean. Cool cakes in pans 10 minutes before removing cakes to cool completely on wire racks. Using a serrated knife, level the cakes. Double wrap the cake layers in plastic and freeze at least 24 hours.


When you're ready to frost the cake, remove cake layers from the freezer. Immediately frost tops and sides with Cream Cheese Frosting.


Cream Cheese Frosting


8 oz. cream cheese, room temperature

1/2 cup unsalted butter, room temperature

2 tsp. pure vanilla

5 1/2 to 6 1/4 cups powdered sugar


Beat cream cheese and butter until smooth. Add vanilla and 2 cups of the powdered sugar. Continue adding powdered sugar until you reach a spreading consistency. Makes about 4 cups frosting and will frost the tops and sides of two 8- or 9- inch layers.


The decorations at the wedding dinner were so lovely and I'm so glad that the cake added to the loveliness. Yay for a wedding cake success!

Carrot Cake Recipe

Friday, November 4, 2011

Fall Wedding Central


It's fall wedding central here at the house. My niece is being married tomorrow and I'm baking the wedding cake.


My mother is brilliant at flower arranging and she's enlisted the help of the grandchildren.


We haven't had a fall wedding before and the colors are so gorgeous! I promise to share my recipes and more pictures...


Tuesday, November 1, 2011

Dia de los Muertos - Day of the Dead

Polka and Bloom Calavera Skull Embroidery Pattern
Today I've been thinking about Dia de los Muertos, or Day of the Dead. The Mr. lived quite a few years in Mexico as a preteen, and then for two years as a missionary for our church. He has a deep love for the people of Mexico, their food, and their culture. Ask the children what one of the favorite things they love to do with their father, besides fishing, and they will say, "making bolillo," a traditional Mexican crispy crust bread roll. Last week we used the last of our tomatoes from the garden to make a roasted tomato salsa in our molcajete. Our favorite soup? Caldo de Albondigas (Mexican Meatball Soup - someday I'll share my recipe with you!).

Sweet Sugar Belle

Last year I attempted to make Day of the Dead cut-out cookies. They did NOT turn out as amazing as these cookies by Sweet Sugar Belle. (But go check out this amazing tutorial she posted!!) I think I like Day of the Dead traditions because the holiday celebrates the amazingly vibrant colors of Mexico and it emphasizes the importance of family and ancestors.

Frida Kahlo Mexican Tile
One of my favorite artists is Frida Kahlo.The way she embraced her ethnic roots, the uncompromising honesty of her artwork, the way she wore her hair!! And her unique perspective.

Happy Dia de los Muertos!

Thursday, October 27, 2011

S'mores Cookies

Martha Stewart S'mores Cookies

I made these yesterday and they are so unbelievably addictive that I'm struggling with getting any sort of healthy nutrition from anything else. The cookie is dense, but crumbly too, with a hint of cinnamon. And the chocolate and broiled marshmallow really do conjure up the taste of campfire s'mores.

Um, I made a double batch. I think I'm in trouble!

Saturday, October 22, 2011

Uncle Winn's Oatmeal Chocolate Chip Cookies


One of my fondest memories growing up was the freedom my Mom allowed in the kitchen on Sunday afternoons and evenings. Baking cookies, muffins, caramel popcorn and simple candies with whatever was in the pantry became a weekly ritual.


But my mother's kitchen was a kitchen dedicated to utility and quantity - there were eight kids to feed! All our meals, including desserts and snacks, were about how far you could stretch the ingredients and how quickly you could get the food to the table.


I distinctly remember the first time I saw my Uncle Winn scoop out and bake cookies. Not only were his cookies super large, perfectly round and laden with chocolate chips, but he was using an ice cream scoop to put the dough on parchment paper lined baking sheets! What was that?!

This was WAY before Martha Stewart popularized the techniques and tools from a gourmet restaurant and showed us how to incorporate them into our home kitchens. I had never seen anyone use a scoop for cookie dough! Nor had I ever heard of parchment paper. These cookies were nothing like the misshapen and hodge-podge cookies we were turning out in our kitchen!

For more than twenty years, my Uncle Winn's cookies have been one of the most anticipated treats at family gatherings. Recently, he shared his recipe in a family cookbook and he's generously allowed me to share it with you!


Uncle Winn's Oatmeal Chocolate Chip Cookies

1 cup butter, room temperature
1 cup sugar
1 cup brown sugar
2 large eggs
2 lids of vanilla (about 2 tsp)
3 cups Quaker Normal Oats (quick oats, NOT old fashioned)
2 cups all purpose flour
2 tsp baking soda
1/2 tsp baking powder
1/4 tsp salt
1 pkg of milk chocolate chips or raisins

Preheat oven to 375ยบ F.

Cream butter and sugars. Add eggs and vanilla and mix well. Add quick oats, flour, baking soda, baking powder and salt and mix well. Mix in chocolate chips. Using a large scoop, scoop out cookies onto parchment lined cookie sheets. Bake 12-14 minutes, or until edges are golden. Don't over bake!

Transfer to cooling racks and enjoy!

Isn't this afghan amazing? My Grandmother Mangum crocheted it in the 70's and I'm BLOWN AWAY at the warm memories this blanket evoke in me and now as an adult, how brilliant her color combinations are! That super crazy brilliant pop of neon coral/peach against the dark green and olive green. LOVE that this afghan is crocheted in a wool blend and that it has retained it's shape and texture. LOVE IT!


Related Posts Plugin for WordPress, Blogger...